


Earlier you could watch the same screen of old analog watches for decades. Whether it’s now – unpacking the box with your first clock on Android, you begin to constantly experiment with the dials in the hope of finding the “same”. Some will have information about the weather, others will have the number of steps passed, others will simply have a beautiful picture… And if you do not find what you need, you can write your own and display what information you want – from the weather and the exchange rate to the remaining time counter before the birthday of your favorite cat. And we will help you with this today!
You can write such an application using Eclipse or Android Studio. I prefer the latter, because it already has hot templates and examples, in addition it is recommended and supported by Google itself. You can write an application only for hours, and you can also write an application that will exchange data with your smartphone. In the second case we will get one APK-file for the smartphone, in which, as in a nesting doll, there will be another APK for the clock. Unpacking will happen automatically during installation.
The architecture of the dial
The Watch Face, located on the main screen, is a service (the successor to the СanvasWatchFaceService), which in a given period draws the screen.
The list of available dials can be seen both on the clock itself and on the matched smartphone in the Android Wear app.
To notify the system about the dial, you need to describe the service in the application manifest itself. When designing, you need to take into account the features of the screens (round or square).
Example of a service description in a manifest:
<service
  android:name=".BatteryWatchFace"
  android:label="@string/my_digital_name"
  android:permission="android.permission.BIND_WALLPAPER" >
  <meta-data
    android:name="android.service.wallpaper"
    android:resource="@xml/watch_face" />
  <meta-data
    android:name="com.google.android.wearable.watchface.preview"
    android:resource="@drawable/preview_digital" />
  <meta-data
    android:name="com.google.android.wearable.watchface.preview_circular"
    android:resource="@drawable/preview_digital_circular" />

  <intent-filter>
    <action android:name="android.service.wallpaper.WallpaperService" />
    <category android:name="com.google.android.wearable.watchface.category.WATCH_FACE" />
  </intent-filter>
</service>
The dial can be with settings and without.
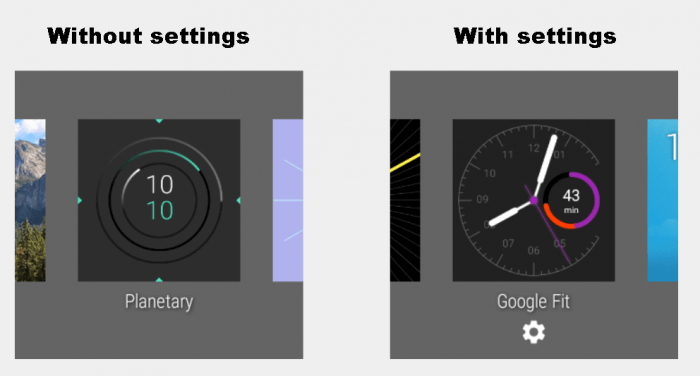
To set the dial settings, you need to create a separate Activity class and describe it in the application manifest. Settings can be called on the clock or create a class of settings for the smartphone.
The description of these settings is available here and here.
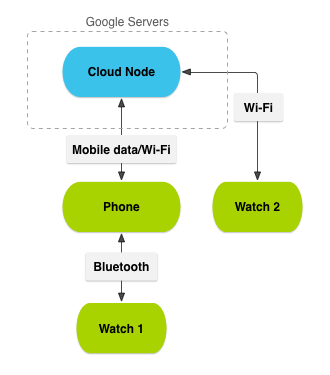
Data exchange
To exchange data between devices, a special data layer (Wearable Data Layer) is used.
Physically, the exchange takes place via Bluetooth 4.0 and Wi-Fi.
Smartphone to work with it should have a version of OS not lower than Android 4.3 (API Level 18).
Data exchange can be implemented through three methods:
- Data Items, a common object whose state is automatically synchronized between devices.
- Messages, messages sent to each other.
- Asset, a large object for sending binary data (for example, a picture), is attached to an object of type Data Items.
Consider the exchange of messages between devices in more detail.
To listen to events, a special WearableListenerService is used.
It should be described in the manifesto:
<service android:name=".ListenerService">
  <intent-filter>
    <action android:name="com.google.android.gms.wearable.BIND_LISTENER" />
  </intent-filter>
</service>
The service will receive messages and process them in the onMessageReceived method.
Example:
@Override
public void onMessageReceived(MessageEvent messageEvent) {
  if (messageEvent.getPath().equals(WEAR_MESSAGE_PATH)) {
    final String message = new String(messageEvent.getData());
    if (message.equals("get_level")) {
      WatchFace.sendMessage(this, getBatteryLevel(this));
      return;
    }
    // Broadcast message to wearable activity for display
    Intent messageIntent = new Intent();
    messageIntent.setAction(Intent.ACTION_SEND);
    messageIntent.putExtra("message", message);
    LocalBroadcastManager.getInstance(this).sendBroadcast(messageIntent);
  } else {
    super.onMessageReceived(messageEvent);
  }
}
To send messages, you must first connect to the data layer.
Connection to the layer:
googleClient = new GoogleApiClient.Builder(this)
  .addApi(Wearable.API)
  .build();
googleClient.connect();
Then, in a separate thread from the UI, send a message.
Sending message:
if (googleClient.isConnected()) {
  new Thread(new Runnable() {
    @Override
    public void run() {
      NodeApi.GetConnectedNodesResult nodes = Wearable.NodeApi.getConnectedNodes(googleClient).await();
      for (Node node : nodes.getNodes()) {
        Wearable.MessageApi.sendMessage(googleClient, node.getId(), WEAR_MESSAGE_PATH, param1.getBytes()).await();
      }
    }
  }).start();
Displaying Data
To create your own dial it is enough to use the standard designer of projects in Android Studio, and after that you already have to modify it to fit your needs.
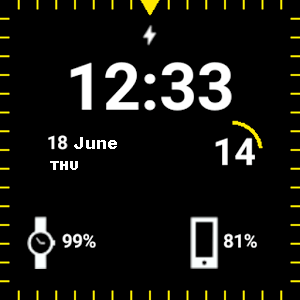
The finished project of the dial, which displays the time and the level of charge of the device, I laid out for you on the github.
The basis for the dial is the CanvasWatchFaceService class.
In its onCreateEngine method, it will create its own instance of the Engine class (the successor to CanvasWatchFaceService.Engine)
Next, a cyclic timer will start, in which the time values will be updated.
The method of displaying information on the screen is implemented in the onDraw(Canvas canvas, Rect bounds). In it, we are given a canvas and its boundaries are defined. Proceeding from that, round at us a dial or square, and it is necessary to draw everything, that it will want to us (the text, pictures, graphic primitives).
Similar work we already done, when using standard tools, we painted the Xonix game in the previous lesson.
It should be noted that the watch has two states: active and streamlined. This is done to save energy, we will not be painting part of the elements in a streamlined mode. To detect these parameters, there is an onAmbientModeChanged event(boolean inAmbientMode), where the input parameter is the inAmbientMode logical flag.
Project architecture
In the end, we will get a project of two modules – one for the smartphone, the other for the clock. The smartphone module will host a service that will receive and send messages about the battery level. In this module, you can safely implement any functionality, such as downloading from the Internet a weather forecast and sending it to the clock. In the module of the clock we will have two services – one for messaging, the other for drawing the dial.